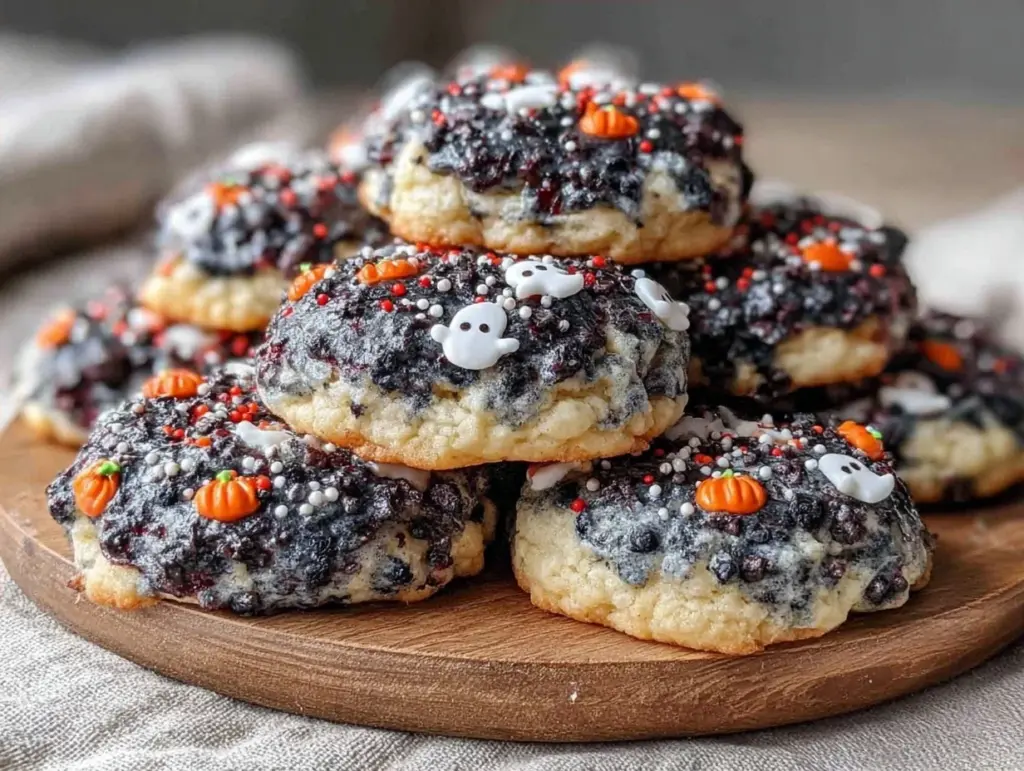
Last October, I stood in my kitchen at 8 PM on a Tuesday, staring at a pantry that looked like a disaster zone. I had promised my niece I’d make “spooky treats” for her school party the next morning. I wasn’t in the mood for baking. I wasn’t in the mood for cleanup. I just wanted to order pizza and go to bed. But then I remembered the black cocoa I’d bought on a whim months ago and never used. It’s that deep, dark powder that makes Oreos taste like chocolate (but isn’t). I thought, why not?
I threw together a batch of sugar cookies, chilled them, and piped on this midnight-black royal icing. The result? My niece screamed. Like, genuinely screamed with joy. Her friends thought I was a wizard. Those cookies vanished in ten minutes. Since then, I’ve made these Halloween sugar cookies with black cocoa royal icing for every spooky party, trunk-or-treat event, and last-minute gathering. They’re not just cute—they’re actually delicious. Crisp edges, soft centers, and that dramatic black icing that looks like it came from a professional bakery. Spoiler: it didn’t.
I’ve tested this recipe more times than I care to admit. The first time, the icing cracked. The second time, it was too thin. The third time? Perfection. Now, I have a system. A simple one. You can make these in under an hour if you’re efficient. And yes, you can even prep the dough ahead of time so you’re not stressing on the day of. This is my go-to Halloween sugar cookies recipe because it’s reliable, festive, and doesn’t require a degree in pastry arts.
Why You’ll Love This Halloween Sugar Cookies Recipe
Look, I know you’re busy. You have work, kids, chores, and probably a laundry pile that’s judging you. This Halloween sugar cookies recipe is the answer to “5 PM and nothing planned.” It’s fast, it’s forgiving, and it looks way harder than it is. Here’s why I keep coming back to this one:
Zero Fancy Equipment Needed — Seriously, if you have a mixing bowl, a rolling pin, and a piping bag (or a Ziploc bag with the corner snipped), you’re good. No stand mixer required. I make these by hand, and the dough comes together in minutes. It’s as easy as making chewy brown butter chocolate chip cookies, but with more drama.
Black Cocoa Icing That Actually Stays Black — Most royal icing recipes turn gray or white after a day. Not this one. The black cocoa powder keeps the color rich and dark, giving you that true spooky vibe. It’s the secret weapon. I’ve tried food coloring alone, and it never looks right. This? This looks like magic.
Make-Ahead Friendly — You can mix the dough, roll it out, cut the shapes, and freeze them on a baking sheet. Then, when you’re ready, just pop them in the oven. The icing can be made the night before and stored in the fridge. This is my life saver when Halloween falls on a workday. I prep on Sunday, bake on Tuesday, and ice on Wednesday. No stress.
Kid-Approved (and Kid-Made) — These are safe for kids to help with. Cutting out shapes is fun. Piping the icing is messy but satisfying. My niece and I made these last year, and she spent an hour decorating ghosts and bats. It was a win for everyone. Plus, they taste good. Not just “good for Halloween,” but actually good. Sweet, buttery, and not too cloying.
Party-Ready — Whether it’s a trunk-or-treat, a classroom party, or a spooky dinner, these cookies are a crowd-pleaser. They look festive, they’re easy to transport, and they don’t melt in the car. I’ve packed them in a Tupperware for road trips, and they survived. Unlike my ultra-fudgy one-bowl brownies, which tend to turn into a mess if you’re not careful.
So basically, if you want Halloween treats that are easy, delicious, and Instagram-worthy, this is your recipe. I’ve made it for friends, family, and strangers (okay, maybe just friends), and everyone asks for the recipe. It’s that good.
Ingredients You’ll Need for Halloween Sugar Cookies
Here’s the best part: you probably have most of this already. The dough is simple sugar cookie stuff. The icing is where the magic happens. I’m particular about the black cocoa, and I’ll tell you exactly why.
For the Sugar Cookie Dough
Unsalted butter (1 cup / 226g, softened) — This is non-negotiable. Softened means cool to the touch but squishable. Not melted! Melted butter makes flat cookies. I take mine out of the fridge 30 minutes before starting. If I’m lazy, I microwave it for 10 seconds, but watch it closely.
Granulated sugar (1 cup / 200g) — Regular white sugar. Don’t use brown sugar here; it’ll change the texture and color. We want those crisp edges.
Light brown sugar (½ cup / 100g, packed) — Adds a little moisture and chew. Don’t skip it. It balances the crispness.
Egg (1 large, room temperature) — Room temp eggs blend better. Cold eggs can cause the butter to seize. I leave mine on the counter while I prep other stuff.
Vanilla extract (2 teaspoons) — Use real vanilla. I know it’s expensive, but it makes a difference. I use McCormick because it’s reliable and doesn’t break the bank.
All-purpose flour (3 cups / 375g) — Spoon and level! Don’t scoop straight from the bag, or you’ll end up with dry cookies. Spoon it into the cup and level it off with a knife. This is crucial.
Baking powder (1 teaspoon) — Fresh baking powder is key. If yours is old, your cookies won’t rise. I check the date every time I buy a new can.
Salt (½ teaspoon) — Enhances the flavor. Don’t skip it, even for sweet cookies.
For the Black Cocoa Royal Icing

Confectioners’ sugar (3 cups / 360g, sifted) — Sifting is important. Royal icing can get lumpy if you don’t sift. I use a fine-mesh sieve. Takes 30 seconds, but it’s worth it.
Black cocoa powder (2 tablespoons) — This is the star. I use Hershey’s Special Dark Cocoa because it’s widely available and has that deep black color. Don’t use regular cocoa powder; it won’t be black enough. This is the difference between “gray” and “spooky.”
Egg whites (2 large, pasteurized) — For safety, use pasteurized egg whites. They’re sold in cartons in the refrigerated section. If you can’t find them, you can use meringue powder, but the texture is slightly different. I prefer fresh egg whites for a smoother finish.
Vanilla extract (½ teaspoon) — Just a hint. The black cocoa is strong enough to overpower it.
Food coloring (optional, black gel) — If your black cocoa isn’t dark enough, add a drop of black gel food coloring. Gel coloring is better than liquid because it doesn’t thin the icing. I usually don’t need it, but I keep it on hand just in case.
Equipment Needed
You don’t need fancy equipment for this. Here’s what I actually use:
Mixing bowls — Two medium bowls. One for creaming butter and sugar, one for dry ingredients. I use glass because I can see how much is left.
Rolling pin — Any rolling pin works. I use a wooden one because it doesn’t stick. Silicone is fine too, just watch the temperature.
Cookie cutters — Ghosts, bats, pumpkins, spiders. I have a Halloween set from IKEA. They’re cheap and work great. If you don’t have Halloween cutters, any shape works. I’ve made circles and squares, and they’re still cute.
Piping bags — I use disposable piping bags because cleanup is easier. If you don’t have them, use a Ziploc bag with the corner snipped. It’s not as precise, but it works.
Parchment paper — Line your baking sheets. I never bake directly on metal. It’s a rule.
Sifter or fine-mesh sieve — For the confectioners’ sugar. Don’t skip this step.
Offset spatula — For spreading the icing. I have one from IKEA that’s like $2. It’s perfect for this.
Measuring cups and spoons — Standard stuff. Dollar store versions work fine.
Whisk — For mixing the icing. A small whisk is best.
Cooling rack — For cooling the cookies. I use a wire rack because it allows air circulation. If you don’t have one, just use a clean towel. It’s not ideal, but it works.
How to Make It: Step-by-Step
Alright, let’s make this! I’m walking you through exactly how I do it, including the little tricks I’ve picked up.
Step 1: Cream the Butter and Sugars (5 minutes)
In a large bowl, beat the softened butter, granulated sugar, and brown sugar together until light and fluffy. This takes about 3-4 minutes with a hand mixer, or 5-6 minutes by hand. You want it to look pale and airy. If you rush this, your cookies will be dense. I know I’m busy, but this step matters. It’s the foundation.
Step 2: Add Wet Ingredients (2 minutes)
Beat in the egg and vanilla extract until fully combined. The mixture might look slightly curdled at first. Don’t panic. It’ll come together when you add the flour. I’ve seen people worry about this, but it’s normal.
Step 3: Mix Dry Ingredients (3 minutes)
In a separate bowl, whisk together the flour, baking powder, and salt. Then, gradually add the dry ingredients to the wet mixture. Mix on low speed until just combined. Overmixing develops gluten, which makes cookies tough. Stop as soon as you see no more flour streaks. The dough should be soft but not sticky. If it’s too sticky, add a tablespoon of flour. If it’s too dry, add a teaspoon of milk.
Step 4: Chill the Dough (30 minutes)
Divide the dough in half. Flatten each half into a disc. Wrap in plastic wrap. Chill in the fridge for at least 30 minutes. This step is crucial. It firms up the butter, which prevents spreading. I know you want to bake now, but wait. I’ve made the mistake of skipping this, and the cookies turned into flat puddles. Don’t do that. If you’re in a rush, you can freeze them for 15 minutes, but chill is better.
Step 5: Roll and Cut (10 minutes)
Preheat your oven to 350°F (175°C). Line baking sheets with parchment paper. Take one disc of dough out of the fridge. On a lightly floured surface, roll it out to about ¼ inch thick. Use cookie cutters to cut out shapes. Place them on the baking sheets, leaving an inch between each. Re-roll the scraps and cut more shapes. You’ll get about 24-30 cookies, depending on the size of your cutters.
Step 6: Bake (10-12 minutes)
Bake for 10-12 minutes, or until the edges are lightly golden. The centers should still look soft. They’ll firm up as they cool. Don’t overbake! Overbaked cookies are hard and dry. I take mine out when they look just done. They’ll continue to cook on the hot pan.
Step 7: Cool Completely
Let the cookies cool on the baking sheet for 5 minutes, then transfer to a cooling rack. Let them cool completely before icing. If you ice warm cookies, the icing will melt. I’ve learned this the hard way. It’s a mess. Wait. Just wait.
Step 8: Make the Black Cocoa Royal Icing (10 minutes)
In a medium bowl, sift together the confectioners’ sugar and black cocoa powder. Add the pasteurized egg whites and vanilla. Whisk until smooth and thick. The icing should be the consistency of heavy cream. If it’s too thick, add a teaspoon of water. If it’s too thin, add a tablespoon of sugar. It should hold its shape when you lift the whisk, but flow smoothly when you pipe it.
Step 9: Pipe and Decorate (15-20 minutes)
Transfer the icing to a piping bag fitted with a small round tip (or snip the corner of a Ziploc bag). Pipe details onto the cooled cookies. I do ghosts with little bat wings, pumpkins with stems, and spiders with legs. Let the icing dry for 2-4 hours. It should be hard to the touch. Don’t touch it until it’s dry. I know it’s tempting, but be patient.
Expert Tips & Tricks
Here’s everything I’ve learned from making these dozens of times. These tips will save you from my mistakes.
Don’t Skip the Chill — I can’t stress this enough. Chilled dough means shaped cookies. Room temp dough means flat cookies. If you forget to chill, put them in the freezer for 15 minutes. It’s a lifesaver.
Use Black Cocoa, Not Just Food Coloring — I tried using regular icing with black food coloring once. It looked gray and muddy. Black cocoa gives you that true midnight black. It’s worth the extra cost. I buy mine at Walmart or Amazon.
Sift Your Sugar — Royal icing is all about smoothness. Lumpy sugar means lumpy icing. Sift the confectioners’ sugar and the black cocoa. It takes 30 seconds, but it makes a huge difference.
Consistency is Key — The icing should be thick enough to hold its shape but thin enough to pipe smoothly. If it’s too thick, it’ll crack. If it’s too thin, it’ll run off the edges. Test it by lifting the whisk. It should drip slowly and then settle back into the bowl.
Work in Sections — If you’re piping intricate designs, work on one cookie at a time. Let it dry before moving to the next. If you pipe too many at once, they’ll smudge. I do 3-4 cookies at a time, then let them dry.
Store Properly — Once dry, store the cookies in an airtight container. They’ll keep for up to a week. If you’re sending them to school, pack them in a single layer with parchment between layers. They’re fragile.
Variations & Substitutions
Once you’ve nailed the basic version, here’s how you can mix it up. I’ve tried all of these.
Vanilla Bean Sugar Cookies — Add 1 teaspoon of vanilla bean paste to the dough. It adds little black specks and extra flavor. I love this version for a more elegant look.
Lemon Sugar Cookies — Add 1 tablespoon of lemon zest to the dough. It adds a bright, citrusy note. Great for spring, but I make them for Halloween too. The contrast with the black icing is fun.
Chocolate Sugar Cookies — Replace ¼ cup of flour with cocoa powder. It makes the dough chocolatey. I like this for a “chocolate ghost” vibe. The black icing on chocolate dough is dramatic.
Gluten-Free Version — Use a 1:1 gluten-free flour blend. The dough might be slightly more fragile, so chill it longer. I’ve used Bob’s Red Mill blend, and it works great.
Dairy-Free Version — Use vegan butter instead of regular butter. The icing is naturally dairy-free if you use pasteurized egg whites. If you’re vegan, use aquafaba (chickpea water) instead of egg whites. It works, but the texture is slightly different.
Spooky Colors — While black is classic, you can use other colors. Orange icing with black details. Purple icing with green details. I like to mix it up. It’s Halloween, after all.
Serving & Storage
I usually serve these straight from the cooling rack. They look best when the icing is fully dry. But here are other ways I’ve enjoyed them:
How to Serve — I place them on a platter with other Halloween treats. They’re a centerpiece. I also pack them in boxes for neighbors. They’re a great gift. I tie them with black ribbon. It’s a nice touch.
Side Dishes — These cookies are sweet, so they don’t need a side. But I serve them with hot chocolate or milk. The fall pumpkin spice hot chocolate is a perfect pairing. The warmth and sweetness complement the cookies.
Toppings Bar — When I have guests, I put out extra icing in different colors. Everyone customizes their cookies. It’s fun. I also have sprinkles, but I rarely use them. The black icing is enough.
Storage Instructions
Refrigerator: Store in an airtight container for up to a week. The icing will stay hard. If it gets soft, it’s probably humidity. Keep them in a cool, dry place.
Freezing: You can freeze the baked cookies for up to 3 months. Wrap them in plastic wrap, then in foil. Thaw at room temperature before icing. I don’t recommend freezing iced cookies. The icing can crack.
Meal Prep: I make the dough on Sunday, bake on Tuesday, and ice on Wednesday. It’s my strategy. It works. I save so much stress.
Pro tip: If the icing cracks, it’s too thick. Add a drop of water. If it runs, it’s too thin. Add a pinch of sugar. Adjust as you go.
Nutrition Information
I’m not a nutritionist, but here’s the breakdown if you’re tracking. This is per cookie (based on 24 cookies).
Per Serving:
– Calories: 180
– Protein: 2g
– Carbs: 28g
– Fiber: 1g
– Sugar: 18g
– Fat: 7g
– Saturated Fat: 4g
– Cholesterol: 25mg
– Sodium: 90mg
What’s Good: It’s a treat. It’s sugar and butter. Don’t expect a health food. But it’s homemade, so you know what’s in it. You can adjust the sugar if you want, but it’ll change the texture.
What to Know: Higher in calories from butter and sugar. Contains dairy and gluten. Not suitable for vegan or gluten-free diets without modifications.
My Take: Look, these are Halloween cookies. They’re supposed to be fun and festive. Enjoy them. Don’t stress the calories. Life’s too short for diet cookies. Especially on Halloween.
Final Thoughts
So that’s my Halloween sugar cookies with black cocoa royal icing! I’ve probably talked your ear off at this point, but when you make a recipe this often, you have a lot to say about it.
This has saved Halloween for me. It’s my answer to “what do I bring to the party?” when I’m tired and don’t want to buy something from the store. My niece loves them. My friends love them. I love them because they’re easy and look amazing.
Make it yours! Try different shapes, different colors, different designs. The best recipes are the ones you adapt to your tastes. And if something doesn’t work, tell me that too. I’m here to help troubleshoot.
If you make these, drop a comment and let me know what you think! I love hearing how recipes turn out in your kitchen. And happy Halloween! I hope your kitchen smells as good as mine does right now.
Frequently Asked Questions
Q: Can I use regular cocoa powder instead of black cocoa?
A: You can, but the icing will be dark brown, not black. Black cocoa is alkalized, which gives it that deep black color. If you use regular cocoa, it’ll look grayish. I recommend black cocoa for the spooky look. But if you don’t have it, regular cocoa works. It’ll just be a different vibe.
Q: Why did my icing crack?
A: Usually, the icing is too thick. Add a drop of water at a time until it’s smoother. Also, make sure the cookies are completely cool before icing. Warm cookies can cause the icing to crack as it dries. If it’s already cracked, you can fix it by piping a thin layer over the cracks. It’ll blend in.
Q: Can I make the dough ahead of time?
A: Absolutely! I do this all the time. Wrap the dough in plastic wrap and freeze it for up to 3 months. Thaw it in the fridge overnight before rolling. It works perfectly. I prep the dough on Sunday and bake on Wednesday. It’s my secret weapon.
Q: How do I store the iced cookies?
A: Store them in an airtight container at room temperature. They’ll keep for up to a week. Don’t refrigerate them. The humidity can make the icing soft. If you need to store them longer, freeze the baked cookies (un-iced) and ice them fresh. They’ll taste better.
Q: Can I use meringue powder instead of egg whites?
A: Yes, you can. Use 3 tablespoons of meringue powder plus 6 tablespoons of water. It’s a good option if you’re worried about raw eggs. The texture is slightly less glossy, but it works. I prefer fresh egg whites, but meringue powder is a safe alternative.
Q: Why are my cookies spreading?
A: Your dough was probably too warm. Chill it longer. Also, make sure your butter is softened, not melted. Melted butter makes flat cookies. If you’re using a hot kitchen, chill the dough for 30 minutes. It’s worth it.
Q: Can I double this recipe?
A: Yes, double everything. Use a larger bowl. The baking time stays the same. I do this when I’m making a big batch for a party. Just make sure you have enough baking sheets. I bake in batches. It’s fine.
Pin This Recipe!


Halloween Sugar Cookies: Best Spooky Treats
- Total Time: 45 minutes
- Yield: 24-30 cookies 1x
Description
Crisp-edged, soft-centered sugar cookies topped with dramatic black cocoa royal icing. This reliable, kid-approved recipe is perfect for Halloween parties and can be made ahead of time.
Ingredients
- 1 cup (226g) unsalted butter, softened
- 1 cup (200g) granulated sugar
- 1/2 cup (100g) light brown sugar, packed
- 1 large egg, room temperature
- 2 teaspoons vanilla extract
- 3 cups (375g) all-purpose flour
- 1 teaspoon baking powder
- 1/2 teaspoon salt
- 3 cups (360g) confectioners’ sugar, sifted
- 2 tablespoons black cocoa powder
- 2 large pasteurized egg whites
- 1/2 teaspoon vanilla extract
- Black gel food coloring (optional)
Instructions
- In a large bowl, beat the softened butter, granulated sugar, and brown sugar together until light and fluffy (3-6 minutes).
- Beat in the egg and 2 teaspoons of vanilla extract until fully combined.
- In a separate bowl, whisk together the flour, baking powder, and salt.
- Gradually add the dry ingredients to the wet mixture and mix on low speed until just combined.
- Divide the dough in half, flatten into discs, wrap in plastic, and chill in the fridge for at least 30 minutes.
- Preheat oven to 350°F (175°C) and line baking sheets with parchment paper.
- Roll out dough on a lightly floured surface to 1/4 inch thickness and cut into shapes.
- Place cookies on baking sheets, leaving an inch between each.
- Bake for 10-12 minutes until edges are lightly golden; centers should still look soft.
- Let cookies cool on the baking sheet for 5 minutes, then transfer to a cooling rack to cool completely.
- In a medium bowl, sift together confectioners’ sugar and black cocoa powder.
- Add pasteurized egg whites and 1/2 teaspoon vanilla; whisk until smooth and thick (consistency of heavy cream).
- Transfer icing to a piping bag and pipe details onto cooled cookies.
- Let icing dry for 2-4 hours until hard to the touch.
Notes
Ensure butter is softened but not melted to prevent flat cookies. Chill dough thoroughly to maintain shape. Sift confectioners’ sugar for smooth icing. Store in an airtight container at room temperature for up to a week. Do not refrigerate iced cookies as humidity can soften the icing.
- Prep Time: 30 minutes
- Cook Time: 10-12 minutes
- Category: Dessert
- Cuisine: American
Nutrition
- Serving Size: 1 cookie
- Calories: 180
- Sugar: 18
- Sodium: 90
- Fat: 7
- Saturated Fat: 4
- Carbohydrates: 28
- Fiber: 1
- Protein: 2
Keywords: Halloween cookies, sugar cookies, black cocoa royal icing, spooky treats, easy baking, kid-friendly recipes


